by Evan Bett, SwingFit
Hip mobility, without a doubt one of the most important components to a healthy golf swing. Back pain, shoulder pain, wrist injuries, lack of power and chunky shots, all a result of restrictions in the hips. When we consider the movement of the hips during the golf swing, we must define an extremely important difference.
The movement of the hips during a swing should be strictly rotational. Any lateral, vertical or horizontal shift of the pelvic girdle is a direct result of compensation and a cause of mechanical flaws. Let’s look at a couple examples from a scientific perspective:
- When a golfer is restricted in either internal or external rotation of the hips. Excess rotational demands are directed to the shoulders and spine. When the golfer doesn’t have the strength or flexibility to effectively compensate at the shoulders or spine they are forced to lead with and overuse the wrists to drive and decelerate the golf club. The main cause of wrist injury amongst golfers.
- Another way golfers compensate for a lack of hip mobility is through excessive elevation of the front heel during the backswing. This happens naturally thanks to a combination of poor hip and spinal rotation. When the hips don’t rotate enough and the spine takes on the additional load, most golfers are forced to elevate the heel and raise the hips in order to get the club around their body. This is the primary cause of chunky or “fat” shots due to a chopping action during the downswing.
Improved hip mobility can be achieved through a corrective exercise program but before you begin stretching aimlessly and exercising without a purpose, keep in mind you may be doing more damage to your body. Figure out which corrective exercise makes sense for you by completing various flexibility tests to assess your level of mobility. Here’s a quick test that measures a common problem amongst golfers – internal and external hip rotation.
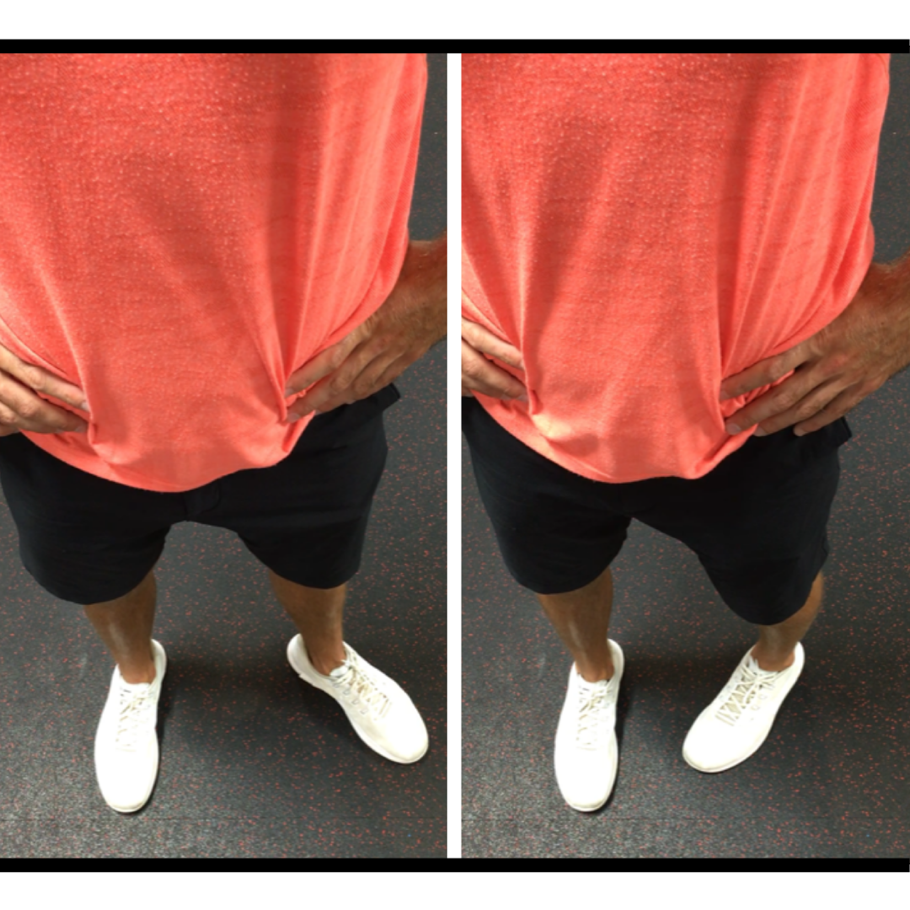
The Cigarette Butt Test
Like the name states, stand with your feet hip width apart and begin to rotate your foot internally by lifting your toe and keeping weight on your heel (as if you were putting out a fake cigarette). While rotating the foot, focus on keeping the hips square and don’t let them rotate in the same direction as the foot. Repeat the process instead rotating your foot externally and complete both tests on each leg.
Optimal mobility would allow for an internal rotation of 40 degrees and an external rotation of 45. If you cannot achieve 40 degrees on internal rotation you suffer from tight external rotators. Anything under 45 degrees of external rotation means you suffer from tight internal rotators.
With reference to your handedness and address position over the ball, an Inability to achieve normal internal rotation of the back hip and normal external rotation of the front hip will limit your backswing. Reduced external rotation of the back and internal rotation of the front hip will limit your follow through. This test is particularly important to senior golfers as tight hips encourage lower back pain and power loss.
You may find a bit of discrepancy or you might even discover that you have difficulty passing the tests on both sides which as a golfer is very concerning – but fixable. Muscle imbalances are a direct result of poorly programmed movement patterns. As we continue to practice, play and endure everyday life with imbalances and restrictions, our bodies begin to adjust and the muscles adapt accordingly to support compensation.
The following stretches will help restore balance and optimize mobility in the hips. When incorporating stretching into your daily routines there’s several factors that need to be considered. Muscle balance comes in stages and needs to be maintained. For optimal results, consult a professional to build you a personalized program to use on and off the course.
Internal & External Hip Rotation
- Internal Hip Rotator Stretch
Rotate your foot outward to 45 degrees or as far as you can while keeping the hips square. Once settled, begin to rotate your pelvis in the opposite direction until you feel a solid stretch. At this point take a deep breath and hold as you internally rotate the foot against the ground.
- External Hip Rotator Stretch
Follow the same process as you did with the internal rotator stretch instead rotating your foot inward. Once settled, begin to rotate your pelvis in the opposite direction, take a deep breath and hold as you externally rotate your foot against the ground.

The 90/90 Stretch
Begin by getting yourself into proper position by sitting on the floor with both your front and back legs bent 90 degrees. The angle in the groin created by both legs should also be 90 degrees. Initiate the stretch by tipping your pelvis forward as if you were pouring contents out over your belt buckle.
As you lower toward the floor, bending only from the hips, keep your chest up and eyes gazing forward as much as possible. As you inhale and hold, push that front leg and ankle into the ground for five seconds and get deeper with each breath. Progress with the stretches by completing 3 to 5 repetitions in each position as shown in numbers 2, 3 and 4.

The Swiss Ball Quadratus & Lunge Stretch
- Swiss Ball Quadratus Stretch
Begin by getting into a runner’s sprint position with your back leg and foot resting on the edge of a swiss ball. Slowly rise into an upright position with the spine perpendicular to the floor. Draw your belly button inward and roll the pelvis under, flattening the lower back (this will increase the stretch and you’ll be sure to feel it if executing correctly).
For added stability, you can place your hand on the side of the swiss ball adjacent to your foot. If you’re having a tough time getting into position, try a smaller swiss ball. Repeat the process 3-5 times per side with a 15 second hold each rep.
- The Lunge Stretch
Assume a lunge position as seen in the example image using a golf club or dowel rod to hold yourself in good form. Begin to roll the pelvis under, flattening your lower back. From here start to slide the whole pelvis forward and raise your adjacent arm to increase the stretch. Hold the stretch for 20 seconds on your tight sides and repeat a 3-5 times each.

For more tests, stretches, tips and demonstrations, visit swingfit.ca and subscribe for exclusive content. Swing healthy folks!
Head to SWINGFIT.ca to subscribe for additional content, exclusive offers and more!
Link: https://swingfit.ca/subscribe/
Instagram: https://www.instagram.com/swingfitgolf/